Adding to the Lens Arsenal:
The basic assumption of this article is that the reader has relegated their point-and-shoot digital to service as a 24x7 pocket or purse camera or replaced it with a smartphone and has made the leap to the world of interchangeable lens cameras. Say hello to a wide new world of photographic opportunities and goodbye to a fair chunk of your disposable income!Note that this article attempts to present some fairly advanced photographic concepts to the new photographer in a user-friendly manner.
ILCs (Interchangeable Lens Cameras) are the only growing segment of digital photography using a traditional cameras. The inexpensive point and shoot is on the endangered species list, having been replaced by ever more capable smartphones. As capable as smartphone cameras have become, at some point their limitations will lead people seriously interested in photography to expand their horizons with an ILC when the smartphones are unable to deliver the image they see in their head. Many of these same people are also a little vague about how that expansion will be achieved.
The first-time ILC owner that uses their cameras on full-auto P-mode with a kit lens is not to be pitied or mocked. everybody starts somewhere. Advancements in exposure algorithms and auto-focus as well as the improved quality in “kit” lenses make these cameras awesome, if expensive, point-and-shoot cameras. More than a few entry-level DSLR owners will never feel the need to expand beyond this point and will be thrilled with the wonderful improvement to the quality of their photos that these cameras can provide right out of the box.
Some, however, will see the potential to improve their chances for great photos by expanding the capability of their equipment. I wrote the pervious sentence as I did for a specific reason. Adding better, faster and more expensive equipment will not make you a better photographer! Henri Cartier-Bresson was one of the last century’s premier photographers and used a simple Leica rangefinder with a normal 50mm lens almost exclusively throughout his career. Adding additional lenses and accessories can make it easier to capture your aesthetic sense for composition and render what your eyes see to a captured image, but it will not guarantee great photos! That still takes practice to hone that skill.
Having made that point, I should add that while it’s possible to get a great frame-filling photo of a grizzly with an 18-55mm kit lens from 10 ft. away, it is much less life-threatening to do it from the other side of the river with a good telephoto. That’s what equipment can do. It doesn’t make you a better photographer but it makes it easier for a good photographer to capture their vision.
Why is it called a “DSLR”?
ILCs come in two basic flavors. The first is the DSLR. DSLR is an acronym for Digital Single-lens Reflex. Simply put, the “Single-lens” part states that the viewfinder looks through the primary lens that provides the image to the film or digital sensor. The “Reflex” part refers to the movable mirror used to divert the image from the capture point to the viewfinder for focusing, composing and analyzing exposure.Why is it called "Mirrorless”?
The second type is referred to as "Mirrorless". Mirrorless cameras are still Digital Single-lens systems using the primary lens to view and compose. They just did away with the "Reflex" part. The movable mirror is gone and the rear LCD or an electronic viewfinder uses the live image from the sensor to compose and such.Part of a system:
A camera body is really just a fancy box that captures light (a really fancy box, to be sure). The real chore is in serving up a nicely-focused, well-lit image for that box to capture. That’s where the other pieces of the system come into play. ILC systems feature the ability to interchange the primary lens with compatible lenses of varying characteristics designed around the requirements of different photographic situations. When choosing a new lens, understanding those characteristics will help you get the result you want. You can also add more powerful flash units than the one built into the body. The more advanced models allow your camera to control studio flash systems that open a door to a whole world of advanced lighting options.The Lenses:
For each of the different brands of ILCs, there are dozens of lenses available from either the camera maker or third-party manufacturers. Why so many? Your camera came with one or two good lenses…what’s wrong with them? Well, nothing really…The “Kit” lens:
Most entry-level ILCs are sold with zoom lenses that cover about 18mm to 50mm or maybe 70mm. Since the highest percentage of shots are taken within this range, manufacturers felt that this zoom range would serve well as a first lens. I don’t disagree. These lenses that are included in body/lens kits are often referred to as “kit” lenses. They are usually very inexpensive, adding only $100 or so to the cost of the body alone. While kit lenses have come a long way with computer-aided design and manufacturing, many people find that the compromises needed to make a lens at this price leaves them wanting more. For many, “more” means adding a $200-$300 70mm-300mm zoom lens. This longer zoom is often bundled in an advanced kit and between the two lenses cover almost all general photographic situations. Again, many people will be happy with this, since it is so very much better than the quality of a pocket camera. I am guessing that since you are reading this, you may not necessarily included in that group.Focal length:
Earlier I mentioned a “normal” 50mm lens. This refers to the apparent field of view that the lens projects onto the sensor. A 50mm lens on a full-frame camera captures the approximate equivalent to what the human eye sees. If you are interested in taking wide scenic pictures of landscapes, groups of people or architecture, you will need a lens with a shorter focal length than “normal”. If you want to stalk big game from a Land Rover on the Masai Mara or from the deck of a whale watching boat, you’ll need one that’s much longer. Most people are familiar with binoculars, spotting scopes and their “x” rating. A pair of binoculars that are listed at 8x20 have a 20mm lens diameter and deliver an image to the eye that is, apparently, 8 times closer (or larger) than the naked eye. Simply put, a 50mm lens on a 35mm format camera is close to 1.0x. A 200mm lens is 4x and a 24mm lens is about .5x. Those magnification factors are how focal length relates to the field of view on Full-frame ILC or a 35mm film camera. If you have an ILC with a smaller sensor (most ILCs), your mileage will vary.Crop factor:
ILCs aren’t all created equal. The 35mm film format that they are descended from used a rectangle of film that measured 24mm x 36mm. Cameras that use digital sensors that are the same dimensions as 35mm film are referred to as Full-frame. They tend to be high-end units and rather expensive, though the cost has dropped dramatically in the last few years. Most of the models use a sensor that is about about 24mm x 16mm. This is the size of the film frame used in half-frame APS-C (Advanced Photo System, Type C) compact film cameras. Because the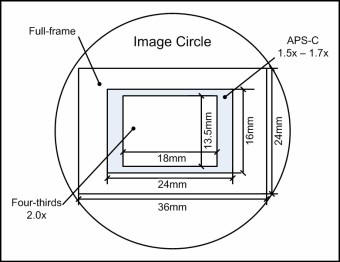 diagonal measure of
an APS-C sensor is only about 66% of a full 35mm frame, it only captures
the central area of the image circle projected by the lens. The end
result is that the “apparent” focal length of a lens on an APS-C camera
it 1.5x what it would be on a full-frame camera (1/.66 = 1.5). This
is called the “crop factor” since the effect is the same as cropping the
center out of a full-frame image and enlarging it. Another player is the
4/3 standard (spoken as "Four Thirds"). It uses a sensor that has one half the
diagonal measurement of
full-frame and, therefore, a crop factor of 2.0x. A 50mm lens on a 1.5x
crop factor sensor would give the same apparent magnification as a 75mm
short telephoto on a full-frame sensor or 35mm film. The same lens on a
Four Thirds sensor would perform like a 100mm telephoto. There are a few
variations, (Canon's APS-C is 1.6x, Sigma is 1.7x) but this illustrates the point. When looking for a lens, you
need to be aware of the crop factor of your camera to have an idea of
what to expect from a given focal length. The 1.5x crop of an APS-C
sensor can give you more reach on a telephoto which can be a real bonus
for wildlife and sports photography. The downside is on the wide angle
side where it works against you turning a 20mm ultra-wide into a wide
30mm equivalent field of view.
diagonal measure of
an APS-C sensor is only about 66% of a full 35mm frame, it only captures
the central area of the image circle projected by the lens. The end
result is that the “apparent” focal length of a lens on an APS-C camera
it 1.5x what it would be on a full-frame camera (1/.66 = 1.5). This
is called the “crop factor” since the effect is the same as cropping the
center out of a full-frame image and enlarging it. Another player is the
4/3 standard (spoken as "Four Thirds"). It uses a sensor that has one half the
diagonal measurement of
full-frame and, therefore, a crop factor of 2.0x. A 50mm lens on a 1.5x
crop factor sensor would give the same apparent magnification as a 75mm
short telephoto on a full-frame sensor or 35mm film. The same lens on a
Four Thirds sensor would perform like a 100mm telephoto. There are a few
variations, (Canon's APS-C is 1.6x, Sigma is 1.7x) but this illustrates the point. When looking for a lens, you
need to be aware of the crop factor of your camera to have an idea of
what to expect from a given focal length. The 1.5x crop of an APS-C
sensor can give you more reach on a telephoto which can be a real bonus
for wildlife and sports photography. The downside is on the wide angle
side where it works against you turning a 20mm ultra-wide into a wide
30mm equivalent field of view. Equivalence
This word is often tacked on the the specs of fixed-lens cameras and is just another way of identifying the effect of crop factor on the field of view. Equivalence refers to the the equivalent focal length of the lens with reference to a full-frame digital camera. A 28mm equivalent lens on a smartphone may only have a focal length of 4mm due to the extreme crop factor of its tiny sensor. Equivalence is seldom used in specs of ILC lenses but I thought I'd toss it in just in case.APS-C Only:
You also need to be aware that some lenses are made for “APS-C only”. These usually carry a designation in the lens name like Di, DT, DC, DX, EF-S and a few more I may have missed. The biggest difference in these lenses is that they project a smaller image circle than a full-frame lens and only cover the area needed by an APS-C sized sensor. This saves weight and cost, but not as much as you might think. Nikon, Pentax and Sony A-Mount lens mounts will accept both types and so be aware of this limitation if you plan to move to a full-frame camera someday. Canon full-frame cameras will not accept EF-S lenses. Some third party APS-C only lenses for Canon will fit but the image circle won't cover the entire sensor, cutting off the corners. Going the other way has no penalty other than size, weight and cost. Any full-frame lens that will mount on an APS-C camera will cover the sensor and often has better corner-to-corner sharpness since the sensor only uses the central portion of the image circle where distortion and other problems are less of an issue.Optimized for digital:
Lenses optimized for digital started appearing shortly after DSLRs became affordable and more widely available. Digital optimization addresses issues that arise from having a shiny sensor instead of film at the focal plane. It was noticed that light being focused on the sensor was bouncing from the sensor to the rear element of the lens and then back to the sensor, producing ghost images. Lens coatings to reduce reflections and flare were intended to fix those problems as light came in, not back out! “Optimized for Digital” lenses have back elements that are curved and coated to eliminate or at least, reduce greatly, reflections that would bounce back to the image sensor. Many lenses have also been re-designed to cause the focused image to strike the sensor at a steeper angle since digital sensors perform best when the light strikes them perpendicularly. Most lenses designed in the last 15 years or so take this into account, so this warning mostly relates to older legacy lenses you might have from film days or buy on eBay.Prime vs. zoom:
A fixed focal length lens is referred to as a prime. Variable focal length lenses are called zoom lenses since you can start at a wider angle and “zoom” in on a subject without moving or changing lenses. Back in the early days of 35mm, lenses were almost always fixed focal length. When you bought a camera, you likely bought it with a 50mm normal lens and added wide and telephoto lenses as need demanded and cash flow allowed. 24mm, 28mm, 35mm, 75mm, 105mm, 135mm and 200mm lenses were common focal lengths. Specialized close-focusing macro lenses were usually available in 50mm or 100mm focal lengths. Zoom lenses were available, but the image quality was markedly inferior to fixed focal length units. It wasn’t until the late 70s and early 80s that the zoom came into it’s own. Improvements in optical technology and manufacturing made zooms a viable alternative for the enthusiast and even working pro. The technology has continued to evolve until today’s top-end zoom lenses produce image quality virtually indistinguishable from their prime counterparts. Even so, primes haven’t lost their usefulness. They have evolved as well. I’ll explain how a bit farther on. First, let’s review some basic info on lens characteristics.Aperture:
An aperture is a hole. It doesn’t get any simpler than that. It can, however, get a bit more complicated. On a lens designation, the aperture range is indicated by the letter “f” (Times New Roman, italic). A 50mm f/1.4 lens has a focal length of 50mm and a maximum aperture of 1.4. Simple-ish. Read on.More than a hole:
The lens f-number (usually called f-stop) is a ratio determined by dividing the diameter of the hole (aperture) in the lens body that the light passes through by the focal length of the lens. It is called a stop because lenses were designed to have detents at specific points as you adjusted the diaphragm so settings could be repeated easily. A 50mm lens with a 25mm aperture would have an f-number of 2.0. The larger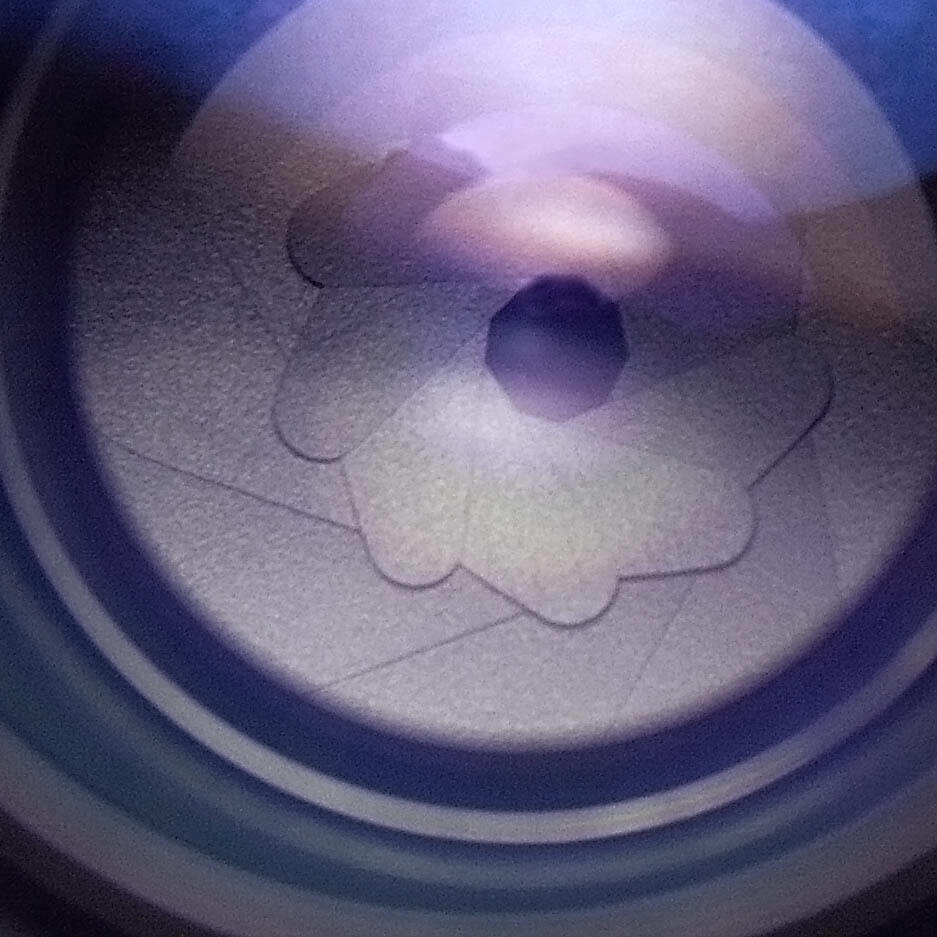 the aperture in
relation to the focal length, the more light can pass through the lens
and strike the film or sensor. Lenses have variable apertures that are
adjusted by a diaphragm mechanism (see picture). Standard f-stops are
1.4, 2.0, 2.8, 4.0, 5.6, 8.0, 11, 16 and 22. Because each stop number
represents a ratio that includes a diameter, each f-stop increase (2.8
to 4.0 for instance) cuts the amount of light reaching the sensor in
half. Each f-stop decrease doubles the amount of light reaching the
sensor. Before you decide to run out and buy a bagful of lenses with
huge maximum apertures, be aware that those big apertures require
larger, heavier lenses with large, heavy lens elements with large, heavy
price tags. Inexpensive wide aperture lenses are available but, with a
few exceptions, lack the exotic glass and sophisticated design needed to
correct distortion and color issues.
the aperture in
relation to the focal length, the more light can pass through the lens
and strike the film or sensor. Lenses have variable apertures that are
adjusted by a diaphragm mechanism (see picture). Standard f-stops are
1.4, 2.0, 2.8, 4.0, 5.6, 8.0, 11, 16 and 22. Because each stop number
represents a ratio that includes a diameter, each f-stop increase (2.8
to 4.0 for instance) cuts the amount of light reaching the sensor in
half. Each f-stop decrease doubles the amount of light reaching the
sensor. Before you decide to run out and buy a bagful of lenses with
huge maximum apertures, be aware that those big apertures require
larger, heavier lenses with large, heavy lens elements with large, heavy
price tags. Inexpensive wide aperture lenses are available but, with a
few exceptions, lack the exotic glass and sophisticated design needed to
correct distortion and color issues.The Trinity of exposure:
Aperture is one part of the photographic trinity of exposure; aperture – controls the amount of available light that is passed to the sensor... shutter – the length of time that the sensor is exposed to the available light and... sensitivity – how quickly the sensor records an image at the light level made available by the aperture and shutter. Shutter speed and sensitivity are determined by the camera, the lens determines how much light gets through. To explain exposure and how it relates to it’s three components, let’s look at one particular exposure value and how changing any of the three components affects it.Sunny 16 rule:
Back before we had evaluative, multi-segment metering and tiny supercomputers in our cameras, people often had to use rule-of-thumb to determine correct exposure. One such rule was the “sunny 16” rule. It went like this; on a sunny day you shoot at f/16 with the shutter speed set to the reciprocal of the speed of your film. If you were using ASA100 (ASA is the forerunner of ISO sensitivity ratings) slide film, your setting would be f/16 at 1/125 and you could expect a reasonably good exposure.Note: Standard shutter speeds in the days of mechanical shutters were 1, ½, ¼. 1/8, 1/15, 1/30, 1/60, 1/125, 1/250, 1/500, 1/1000. Since each step allowed half as much light to reach the film, the values have carried over to remain as standard values in the current era of incredibly accurate electronic shutters. You may set your dials or menu to f/8 at 1/500, but the actual shutter speed could be 1/462.
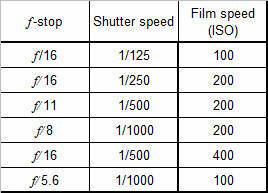 If you change any one of the three values, you
must change at least one of the others to get the same exposure value.
The following chart illustrates this by shifting the exposure components
up and down. Keep in mind that even though the individual components
vary considerably, each three-value set listed in the chart
will result in the same exposure value.
If you change any one of the three values, you
must change at least one of the others to get the same exposure value.
The following chart illustrates this by shifting the exposure components
up and down. Keep in mind that even though the individual components
vary considerably, each three-value set listed in the chart
will result in the same exposure value. Remember these values are for a sunny day where shooting is pretty optimal. A kit lens is fine for shooting pictures of the family playing in the pool or soccer at 10 AM. When conditions are less than optimal, such as shooting a football game under stadium lights, you are facing some technical obstacles. Increasing ISO speed has a practical limit before digital noise or film grain destroys the image’s usefulness. You need a the shutter speed fast enough to keep camera or subject movement from blurring the image, so a larger maximum aperture becomes necessary to keep your shutter speed high enough to stop the action. Those sports photographers don’t haul 15lb telephotos up and down the sidelines just for the exercise!
Depth of field:
Wide apertures have some side-effects that are, at once, a benefit and a challenge. One of these is depth of field. This refers to the distance on either side of the plane of focus that objects will still appear to be in focus. This part can get ugly as terms such as “circles of confusion” come into play, so we’ll just gloss over them with an illustration:

|
|
|


As you can see, depth of field can have a significant effect of the impact of a photo. A landscape benefits from enough depth to render everything in the frame tack-sharp, but a portrait with a very narrow depth softens the background and focuses attention on the subject.
Bokeh? - What the heck is bokeh? Pronounced bow-keh, it comes from the Japanese word for "blur". It refers to the look and quality of the out-of-focus areas in an image. In the f/2.8 image above, the out-of-focus areas are smooth without patterns caused by lens imperfections or diffraction by the diaphragm. That is the desired effect for most situations so when a lens is said to have "smooth" or "creamy" bokeh, this is what is meant. Bokeh is more important in wide aperture lenses with shallow depth of field that may be used for portraiture or product photography.
APO?:
APO is one of the few flavors in the photographic alphabet soup that isn’t an acronym. It’s an abbreviation for apochromatic. When you’re shopping for a long telephoto or tele-zoom, you may see APO as a component of the marketing text. Why do you need it and why do APO lenses cost more? If you have ever played with a prism or have seen the pretty rainbow that sunlight shining through a beveled window will cast on the floor, you have seen that different wavelengths of light are deflected at slightly different angles as they pass through glass. In a camera lens, this causes the image to be perceived as un-sharp since the variously image colors don’t focus on the film or sensor at the same point. On a short focal-length lens, the difference isn’t usually great enough to cause a problem, but as the telephoto gets longer, the problem gets worse. This is one reason that early 35mm camera systems rarely offered lenses longer than 135mm. Optical technology has now cured this problem with lenses designed to focus visible light equally regardless of wavelength. Apochromatic lenses use multiple individual lens elements like regular lenses, but some of the elements are made of special glass that bends different wavelengths of light at slightly different angles. When these are all stacked together in the right order, all of the different angles add up and the result is all wavelengths focusing in the same spot. A very slick trick if you think about it!Needless to say, these special glasses needed for the APO lenses cost more. You’ll see ED, SLD, LD, Fluorite, etc. tacked onto a lens name to indicate that it has components made of rare and expensive materials. You’ll also see something tacked onto the price tag of said lens as well.
Stable is good:
Image stabilization is no longer a luxury. Mechanical stabilization has been around since the middle of the last century. Gyroscopes and shock absorbing mountings like the SteadyCamTM made sharp vehicle-mounted and aerial images possible. It wasn’t until the mid-90s when Canon introduced stabilized lenses that were affordable to individuals rather than governments or corporations that the technology trickled down to the casual photographer. This has had a profound and, I think, largely unappreciated impact on photography. Regardless of whether you are shooting your kid blowing out birthday candles or a million-dollar ad campaign, the biggest enemy of sharpness is camera movement. Stabilized lenses can add two to three or more stops to your ability to capture an image without blur. Another rule-of-thumb like the “Sunny 16” rule is the “inverse-of-the-focal-length” rule, or the “1/f rule”. (“One over f” is the spoken version). This is another handy guideline that tells us that the minimum blur-free shutter speed to shoot hand-held at a particular focal length is 1 (one) divided by the focal length. For a standard 50mm lens you would set your camera to 1/60th and for a 200mm telephoto you would use 1/250th. (Remember, early shutters only had a limited number of settings in one-stop increments). A two-stop improvement via stabilization would mean that if you were shooting with a 300mm telephoto you could easily shoot that dimly-lit auditorium or elusive bear picture using 1/125th at f/4 instead of 1/250th at f/2.8. This translates into not carrying a 10lb. tripod on the three-mile hike to the bear viewing platform, not fumbling to set up said tripod in a crowd at the school auditorium while your child is on stage getting their first award and, finally, you will have only paid about $1,200 for that stabilized 300mm f/4.0 lens instead of the $3,800 for the one that would let you shoot using 1/250th at f/2.8. I could probably wave off the first two, but the last one really gets my attention.Most ILC manufacturers offer some form of stabilization and have their pet name for it. They also deliver it in different ways. Lens-based stabilization came first and was the only option for quite a while. In 2003, Minolta went outside the box and introduced sensor-based stabilization in their A1 digicam. Before digital, the concept of moving the film plane to compensate for camera shake was dismissed as un-workable, and rightly so. The motion sensor technology used for lens-based systems would work, but a method for moving the mass of the film, the winding spools and all the other film transport mechanism was not technically (or, at least, economically) feasible. Digital changed all that. Now, instead of film and all its attendant machinery, you had a tiny, light silicon chip with a few grams of electronics. Why not move it? Minolta’s “Anti-Shake” technology worked and was included in their first DSLR in 2004. In an ILC, sensor-based stabilization means that every lens that will fit that camera mount becomes stabilized, even wide-angle lenses, macro lenses and fast primes. The concept of stabilizing anything other than a telephoto was pooh-poohed at first, but the benefit of stabilization won out and lens-stabilized wide-angle zooms soon appeared in the line-ups of the pooh-poohers. The demise of Minolta’s camera division left the technology in the hands of Sony and they have continued using sensor-based stabilization except for the earlier E-Mount mirrorless cameras. Olympus and Pentax have joined the sensor-stabilized ranks as well. Nikon and Canon have stayed with lens-based technology.
Which is better? No real winner. Or, more accurately, there is no real loser. Extensive tests have shown that in newer models, both are capable of about the same level of stabilization with a slight edge going to lens-based in some situations and to the in-body tech in others. The main difference is that the camera-based solution provides it to any lens attached. Even full-manual third-party or older lenses adapted to fit.
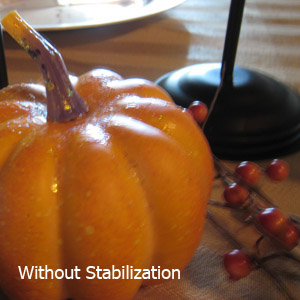
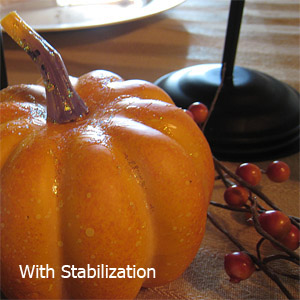
What can you expect? if you look closely at an image that seems out of focus and was taken without stabilization, you may find that was in perfect focus, but a small amount of movement causes the sharp edges to blur. The illustration photos were taken in room light at 1/10th, hand-held. Notice that in the picture without stabilization, the highlights are the same size as the stabilized picture, but are elongated diagonally by camera movement. The stabilizing mechanism shifted the image opposite the direction of movement in the stabilized picture, keeping the image sharp.
|
|
|
Is this the magic bullet? Nope. There are limitations to the effect of stabilization. No matter how good the system is, it can't stop a moving object at 1/25th of a second! If Aunt Gladys turns her head in the family photo just as you snap the picture, it will come out as a blur, stabilized or not. A photo of little Bobby swinging away at the ball at 1/60th will show a
 tack-sharp white plate and a perfect chain-link fence in the background, but the bat, the ball and probably most of Bobby will
be colored streaks. If you are panning with a moving subject, the
stabilization will have no effect since the camera is moving beyond the
limits of the system to compensate for it. Some high-end stabilized
lenses can be set to only stabilize vertical movement for help when
panning, but it still takes good technique and practice to do it right.
Intentional motion blur can give a picture a sense of drama.
Unintentional blur just ruins an otherwise good photo. Stabilization can
help reduce or eliminate unintentional blur.
tack-sharp white plate and a perfect chain-link fence in the background, but the bat, the ball and probably most of Bobby will
be colored streaks. If you are panning with a moving subject, the
stabilization will have no effect since the camera is moving beyond the
limits of the system to compensate for it. Some high-end stabilized
lenses can be set to only stabilize vertical movement for help when
panning, but it still takes good technique and practice to do it right.
Intentional motion blur can give a picture a sense of drama.
Unintentional blur just ruins an otherwise good photo. Stabilization can
help reduce or eliminate unintentional blur. Having a stabilized system isn't an excuse for giving up good photographic techniques. You still need to hold the camera as steady as possible and squeeze the shutter button smoothly without jerking the camera. All the old rules for sharp, steady shooting still apply, stabilization just extends their range. If you have a camera that doesn’t use sensor-based stabilization, consider getting stabilized lenses whenever possible. It really is worth it. The picture of the moon over the cruise ship was taken hand-held at 1/5th of a second. Even with a tripod, the engine vibration and strong wind would have made the shot very difficult without some form of stabilization.
A lens for every season:
Now that we’ve covered what lenses are all about, let’s take a snapshot (pun intended) of what they’re used for. We’ll go in order from wide to long. For sanity’s sake I’ll use 35mm full-frame equivalent focal lengths, so don’t forget your crop factor!Fish-eye - These are specialty lenses that capture strongly curved distorted image that covers as much as 180° field of view (more than 180° in at least one grossly expensive 6mm Nikkor). There are basically two flavors. One covers the entire frame and the 180° is measured diagonally across the frame. The other is called a circular fisheye and as its name suggests, creates a circular image in the middle of the frame. Originally called “full-sky” lenses and used for astronomy and weather surveys, they are used for visual impact shots where the extreme curves or close focus present the subject in an exaggerated perspective. They come in focal lengths from 16mm down to 6mm depending on whether they are for 4/3, APS-C or Full-frame. They can be expensive if brand-name glass is a necessity. Otherwise excellent third party versions are available
Ultra-wide – Anything under 24mm that is corrected to keep lines in the picture straight or nearly so ("rectilinear" is the term) is considered an Ultra-wide angle. They show an extremely wide field of view letting you cram a lot of scenery into an image. If you’ve seen a picture of a flowering plant up close and in focus while the huge expanse of mountains in the background are tack-sharp as well, it was probably taken with an ultra-wide. I call these “real-estate” lenses because their ability to compress a scene makes it look like you are farther away from the subject than you really are. Making a small room look large sells the house, right? 21mm down to 12mm is the typical range for ultra-wides. Below that it becomes very difficult to keep lines straight. Fairly expensive for name-brand but surprisingly useful. Ultra-wide zooms with excellent image quality and low distortion are available.
Wide angle – 35mm down to about 24mm is “normal” wide-angle. The upper end of this range is commonly used for group shots of people, walk-around snapshots of people engaged in activities, people against scenery or landmarks and such. 35mm was such a popular choice for wide angle that the preference has carried over into compact cameras and digicams. Their zoom lenses almost always start at 28mm-35mm. The wide end works great with buildings, mountains, interiors of large rooms, scenes with a definite horizon and cloud formations. Mostly because this range is used a lot, it is covered by almost all general-use zooms. This makes fixed focal length lenses in this range less common except for high-quality, wide aperture models. Rather expensive for good ones.
Normal – At around 50mm, a “normal” lens approaches the perspective that our unaided eyes see. Undistorted photos of small groups of people, isolating building features and shooting still-life images are common targets for a normal lens. Once the de-facto “kit” lens when you bought a film SLR, the normal lens is no longer included as a "standard" lens in a kit, but is still used by photographers that want an inexpensive wide-aperture portrait lens. Not too expensive with a relatively fast f/1.8 aperture. A good budget portrait lens, especially on APS-C where it works like a 75mm lens.
Short telephoto – 70mm to 135mm is the range of the short telephoto. Used widely as portrait lenses. The 85mm f/1.4 is regarded as a near-perfect lens for portraiture. It’s wide aperture and shallow depth of field allows the easy use of natural light and makes it easy to isolate the subject from a distracting background. The slight compression at this focal length is considered flattering to faces. This range is usually where long zoom lenses start, again relegating fixed focal length lenses in this range to specialized, wide-aperture or macro lenses.
Telephoto – This describes lenses 200mm and up. Over 400mm is often called “super-telephoto”. If you look at the sidelines of any pro football game, the horizontal forest of giant lenses tells us that much. Telephotos are used when the subject far away and the situation is either too dangerous or too difficult to approach. Of all the fixed focal length lenses, the telephotos will probably be around the longest. Making fast zoom lenses in the super-telephoto range requires the lenses to be very large and heavy. A 400mm f/2.8 Canon super-telephoto weighs in at about 13 lbs. The Sigma 200-500 f/2.8 zoom is a massive 35 lbs. Pricey due to APO glass and large optics.
Teleconverters – Teleconverters are add-on lenses that mount between the camera body and the lens and magnify the image from the lens as it passes through to the image plane. There are many aftermarket brands, but the best results are with units that are made by the same manufacturer as your lens and are matched optically. They usually come in 1.4x and 2.0x magnifications with 3.0x available from some third party manufacturers. With a 2.0x teleconverter (easy math choice), your 70mm-200mm zoom becomes a 140mm-400mm zoom with just a twist and a click! Wow! Something for nothing? The answer, as you may have guessed, is “no”. Since the converter is mounted between the lens and the camera and the magnification is achieved by spreading the image into a larger circle on the focal plane, it cuts the light reaching that plane by the same factor as the magnification. If the lens in the example was a fast f/2.8, it is now a moderate f/5.6. You also lose some quality, but with the better units on the market, the loss is nearly imperceptible. The light loss is important when considering using a teleconverter since a zoom with a maximum aperture of f/5.6 becomes an f/11 lens and makes focusing and even seeing your subject difficult except in the brightest conditions.
Macro – Macro lenses are specially-designed to focus down to extremely short distances and produce a flat field of focus for copying documents and such. True macro lenses will focus close enough that the image produced on 35mm film or a full-frame sensor is life-size. In other words, if you took a 35mm slide of a dime, the image on the slide would be the same size as the dime. This is called a 1:1 macro. You’ll see a lot of zoom lenses with “macro” tacked onto their names. These lenses focus close, but seldom give more than a 1:4 ratio (the image on the film would ¼ the size of the dime). Macro lenses are usually f/2.8 and come in 50mm - 200mm fixed focal lengths. Whether 50mm or 200mm, they seldom get closer than 1:1 but the longer the lens, the farther away you can be from the subject at 1:1. This is important for photographing small living things that get nervous as things get closer. These lenses are also useful for normal photography and the longer focal lengths can double as a high quality short to medium telephoto. There are other types of macro lenses that focus insanely close and with give 3:1 or even 5:1 ratios but unlike regular macro lenses they have limited use in non-macro photography. Moderately pricey due to very precise optics and complicated focusing mechanisms.
Specialty – PC lenses don’t fit on your webcam. PC stands for Perspective Control. A few manufacturers produce these extremely specialized lenses for use in architectural and illustration (advertising) photography. They are manual focus only and allow adjustment of the front of the lens in relation to the rear of the lens by shifting it up, down, right or left as well as tilting the plane of focus to keep building lines straight or move the area covered by the depth of field to include or exclude subjects. These are also called Tilt-Shift lenses. The ability to correct perspective problems in image editors is making the need for one of these in a given situation less common than ever.
Lensbaby! – This little gem is available in different versions for most camera mounts. It is a simple lens on a small bellows or ball and socket mechanism that is designed to purposely distort the edges of the image and gives you the ability to move the sharp central focus to anywhere in the frame. I have one and thoroughly enjoy using it. Great creative fun!
Many lenses in one: Zooms – By far and away the most common lenses these days. They come in a wide variety of focal length combinations covering virtually every lens type mentioned above. Even the inexpensive models from reputable manufacturers are better than the all but the very best zooms from 20 to 30 years ago and the best of today’s zooms are very nearly as sharp and distortion-free as prime lenses of similar focal lengths. It’s a great time to be a photographer. When I started out in the world of SLR photography in 1973, the thought of an 18mm-300mm zoom lens that wouldn’t distort an image like a milk bottle (yes, milk used to come in bottles!) was right out of science fiction.
Zooms usually have variable apertures. This means that while that lens may have a maximum aperture of f/4.5 at 70mm, the maximum aperture may only be f/5.6 or f/6.3 at 300mm. Keep this in mind when shopping because most autofocus systems perform very poorly at apertures smaller than f/5.6.
Zooms are available that maintain a constant maximum aperture over their entire range, but they do this at the expense of additional weight and cost. The two most common fixed apertures are f/4 and f/2.8. Constant-aperture zooms tend to be at the top of a manufacturer’s lens line-up where it comes to build quality and optics. To illustrate, a Sigma 55-200mm f/4-f/5.6 zoom is 3.4” long, 2.8” in diameter, uses a 55mm filter, weighs 10.9 oz. and costs $140. A Sigma 70-200mm f/2.8 is 7.2” long, 3.4” in diameter, uses a 77mm filter, weighs three pounds and costs north of $1000. I shot with a 70-210mm f/3.5-f/4.5 on my film cameras and my 6MP DSLR for years and was perfectly happy with the results. Later, I bought the Sigma 70-200mm f/2.8 and I have to say that I was shocked at the difference. The viewfinder is brighter (bigger aperture) and the resolving power of that expensive APO glass is remarkable. The difference on the 12MP Sony A700 is even more noticeable and the resolution held up well on the 24MP A77. I’m not saying that everyone needs to go out and buy all fixed aperture zooms, but you should be aware that you do get a real benefit for the extra money. Is the difference in price worth it? That’s up to you. Another consideration is the size and weight. I’m not a dainty person and carrying a DSLR with this lens attached for a whole day isn’t too bad. At 5+ lbs., that combination can be a burden to pack and haul half way across the world.
Another, type of zoom is the one-lens super zoom. These lenses cover a tremendous zoom range and can theoretically replace a whole bag full of lenses. A zoom with a 28mm-300mm range for film or full-frame and 18mm-300mm for APS-C cameras cover about 98% of average shooting situations. These are tempting as a one-lens solution for travel. How good are they? These lenses were not even possible until computer-aided design and manufacturing became available. The early ones were ok, but image quality was limited by design and technology. Nowadays, they are capable of producing very good results. They can’t match top-end 3x or 4x zooms for focusing speed or absolute quality, but their advantages are great and the balance of quality vs. convenience can lean hard in the direction of the super zoom.
Adapt it! - One of the benefits of the mirrorless trend is that without the need for a mirror and the mechanism to move it, the distance from the lens mount to the sensor can be reduced (Flange Focal Distance). This makes mirrorless cameras potentially smaller than their mirrored counterparts but it's main value (to me) is that it leaves a lot of room in the design to adapt lenses from other brands, devices (enlargers, CCTV cameras, etc.) and centuries. I shoot with Sony E-mount cameras now and I can literally adapt almost any lens ever made to it. Almost all of these adapters only let you use the lens in full manual mode but on the newer cameras with newer adapters, you can use Canon or Nikon lenses with full autofocus. I have a $30 35mm f/1.7 CCTV lens adapted to my A6000 that takes surprisingly good images with odd swirly patterns in the out of focus areas. Not planning to go Pro with it, but a lot of fun for a few bucks.
What lenses do I need?
Need? Need? To make great photos, you need a 35mm or 50mm standard lens. You might want a kit wide-angle zoom and a kit tele-zoom to cover the bases. If you are making inroads into photography as a serious or paying hobby and doing large prints or just obsessive over quality, the flood gates open up.I’ve seen people posting on photography forums with 25 lenses in their “gear list” and a browse through their online galleries shows that almost all were taken with one or maybe two lenses.
Start off with the lens you will use the most. If you can afford it, get the best lens you can in that range. If you can’t, don’t worry and get the best you can afford. Even the kit lenses included in camera/lens bundles are pretty good these days. A very, very large percentage of interchangeable lens camera owners never buy another lens after buying a bundled two-lens kit.
If the kids or grandkids are playing sports and you want to get those frame-filling action shots, you may need a good long zoom. If it’s high school sports played at night, you may have to consider a fast, constant-aperture (f/2.8) zoom.
Doing a lot of people portraits or social events? A 24mm-70mm f/2.8 does a great job in this area, but a f/1.4 portrait lens really makes this type of photography stand out. (This is also where the need for real photographic lighting equipment starts.)
If you love the outdoors, a good wide-angle zoom will serve you well.
Like flowers? Bugs? Cool little mechanical devices? Buy a dedicated macro lens and break out the tripod!